Tuesday, February 19, 2013

Headboard Redo

Here is a picture journal of a king sized headboard redo.

Ugly fabric, great shape. We marked the edge of the border with a marker then pulled it off with hammers. Keep the upholstery nails (not staples) that attached the boarder piece, save them for when we reattached the boarder.


The Marker mark is red- we put it there to make sure the staples went past that point.


We laid the upholstery weight fabric backed with batting over the  center, then stapled along the outside edge of the marker guide we drew. then, cut away the extra fabric.


We wrapped extra batting around the boarder because the fabric was gathered and we were too  smart/lazy to remove it... I wish I would have got a picture of how truly hideous the fabric was. we just wrapped it and put a few staples in to keep it in place.


Cuteness.


more cuteness


we stapled the fabric only to the inner curve of the boarder piece so we could wrap the rest of the fabric around to the back side of the headboard. Lift the fabric on the boarder gently and tack the boarder to the main headboard by using the nails we saved from when we removed the boarder.


We didn't have enough fabric for one continual piece around the boarder, so we covered it with three separate piece of fabric. Then we folded the fabric under and overlapped it at the corners. Pulling it tight and stapling it to the back.


Three hours later.


It needed a little something. So we added nailhead trim. Beautiful!


Saturday, February 2, 2013

Jewelry hanger

This a a project I worked on with my mom last summer. Her jewelry was always in tangles in the jewelry box and she could never see all the pieces without digging around and making more of a tangled mess. 
To do this project you'll need:
large cork bulletin board
Fabric
Spray adhesive
Cup hooks

It's really quite easy. Align the fabric over the cork board and then use spray adhesive to attach it to the cork board. I cute the fabric just barely bigger (like 1/4 or 1/8 of an inch) than the inside edge of the frame. Then, I used a utility knife to shove the fabric into the crack between the edge of the frame and the edge of the cork.
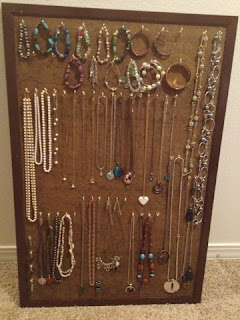
Next, we laid out all the jewelry onto the surface and came up with a plan for the lay out of the hooks that would accomodate all the jewelry.
I used a marker and a ruler to evenly mark the spot where the hooks were going to be attached.
Last, we just screwed in the hooks by hand. Some took a little more elbow grease than others, but it was pretty easy once you broke through the fabric.
Then, we hung it up and put on the jewelry- super easy!
A little trick that might help when it's time to hang the jewelry, take a picture of the original layout of the jewelry when you are making the plan of where to put the hooks, that way if you forget how they were all suppose to fit, you have a frame of reference.