Thursday, June 30, 2011

Kid's art display frames

Sometimes I get a bit sidetracked.  Never fear, I'm still working on the Single Girl quilt...cutting and cutting and cutting.   In the mean time, two important things happened.  My kids took an art classes and my mother-in-law was getting rid of some old frames.
Enter craft project here:
Display frames for my kids art-
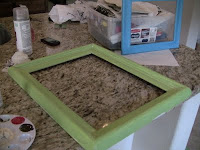
I painted all the frames off-white with acrylic craft paint.


 When they dried I added some bright fun colors:  red, blue, green and yellow.


Then I "antiqued" them a little by using some dark brown paint and a staining medium. 
 I used a foam brush to apply it and then wiped it off with a paper towel.

 I got some strong craft magnets and some big washers.  I cut back some of the corrugated cardboard and stuffed the washer inside (on the top side of the cardboard where I would hang the picture).


I thought the frames should look nice weather or not there was any artwork in them, so I went through my craft paper and found some that wouldn't distract from the artwork, but would also be pretty.  I found some with a natural textures- rocks, jeans, sand and wood.
 I glued the paper onto the cardboard that fit in each frame.  The ones that I put the washers into.

 Here they are!  Finished with beautiful artwork in them.  I used the magnets to attach the artwork to the frames.  Easy to use and easy to change pictures.
 And without any artwork- still lookin good!

Thursday, June 23, 2011

Week 2 Etsy Item

Well, I failed to add an item to my Etsy store on Week one, but this week- Success!

Here is my new listing:
Orange Zipper Purse

Opinions WANTED!

Please tell me in the comments which option you like the best.  (Example of finished quilt)
Here are three different options for the layout of the fabric:
1)Sort of a rainbow layout
2)Random


3)Another random option

Week twoooooo

Whaaaa!
I have such a love hate relationship with The Single Girl Quilt.  It. Is. Gorgeous.  AND  It. Is. Hard!
I finally have all the templates cut out- yowser.  now I have to figure out how to cut, what to cut, and how much of what to cut.  I'm a bit confused by it all.  I need my mommy.

Sunday, June 19, 2011

Week 1 (June 13-19) Monkey Quilt Pattern and Kit

This work in progress has been a long time coming...  Just ask my sister-in-law.  I was suppose to make it for her for Christmas.  Yeesh.
It is a kit I put together, all cut out, with instructions.

The center on the quilt should look like the above picture (only much neater when sewn together)

Here is the PDF file of measurements and instructions.

Friday, June 17, 2011

Old quilt = New Pillow

My mother-in-law pulled out on of her knitted afghans that she had worked on for years...  Some moths and one of her cats had decided to make it home.  It was in terrible shape.  But she loved it, her aunt had started it and then she lovingly had finished it.  So she had it dry cleaned hoping maybe it could be salvaged.
When she realized it couldn't be saved, she was going to throw it away.  Enter crazy daughter in law (me).

MIL:  Kendra, do you think you could use this, maybe do something with it?
Me: That's so cool!  Did you know Chevrons are totally in right now?
MIL:  I know, I love it, it's just full of holes and cat hair, but I hate to throw it away.  My aunt started it and then I spent years working on it to finish it!
Me:  You can't throw it away- it's awsome!  I'll make a pillow out of it!
MIL:  OH!  I knew you'd be able to do something with it.  :)

Guess I have a reputation.
So I took it home and washed it.  Hoping to get more of the cat hair out- I could have recreated a cat from all the hair that came off.  It was pretty funny.  Then I looked through my fabric stash to see if I had something that would work with the colors of the blanket.  Nope.  BUT  I did have some fabric dye and some old painter's drop cloth.  Bingo.  Plus I had this great yellow ribbon that my sister-in-law Kristy had given me because- as she put- she was sure I could do something with it.  Ha!
I measured the extra pillow form I had and cut the drop cloth into a pillow cover.  I dyed the fabric and dipped the ribbon in the dye as well.  The colors were lovely!
I laid out the blanket and found a spot that didn't have damage on it, I pinned the dyed fabric to the blanket, and cut out a square about 3 inches larger than the pillow size.

I sewed first a straight line around the edge and then followed up with a zigzag stitch to make sure that none of the knitting unraveled.
I covered some cotton cord with the ribbon to make some cording for the edge of the pillow.

Then I sewed the three pieces together leaving one end open so I could stuff the pillow in.

I snipped the corners and resewed them for stability.  Then turned the cover inside out.
I ironed the edge and hand sewed the last side together.
I think it turned out beautiful!  Did I mention that chevrons are SO in right now?!

Friday, June 10, 2011

Summer Project List 2011

I have many WIPs (works in progress)  taking up space in my craft room.  I need to complete them, to clear clutter and my mind, and how!
I will be completing 1 project a week for the next ten weeks.  Also each week I will add an item to my etsy shop.
Here is the schedule:

June 13-18  Finish pattern and put together kit for Sock Monkey quilt
June 20-25  Finish cutting and sew together the top of the Single Girl quilt
June 27-July 2  Make a cooking video "How to make Pulled Pork"
July 4-9  Start reupholstering the love seat
July 11-16 Write a pattern for my strawberry fields quilt
July 18-23  Finish the Strawberry Cake quilt
July 25-30  Finish reupholstering the love seat
August 1-6  Build a bridge with Ethan
August 8-13  Organize, Sort, and clean craft room
August 15-20  Halloween Advent Calendar